Create and manage fax speed dials
Use the control panel or HP Embedded Web Server (EWS) to manage the speed dials for the printer.
Connect the fax cable to the fax port on the printer and to the phone port on the wall.
Step one: Access the HP Embedded Web Server (EWS)
- 1.
From the Home screen on the printer control panel, touch the Network  button to display the IP address or host name.
- 2.
Open a Web browser, and in the address line, type the IP address or host name of the printer exactly as it displays on the
printer control panel. Press the Enter key on the computer keyboard. The EWS opens.


NOTE:If the Web browser displays a message indicating that accessing the website might not be safe, select the option to continue
to the website. Accessing this website will not harm the computer.
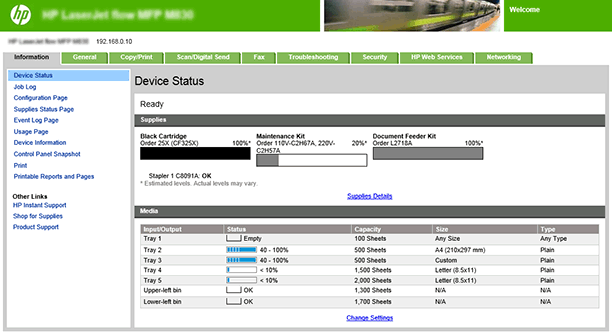
Method one: Manage speed dials in the HP Embedded Web Server (EWS)
There are 1000 speed dials (numbered 000–999) available on the printer control panel using the fax job screen. Speed dials
are listed on the fax screen by speed dial number, and the speed dial name is also displayed. Speed dials can have multiple
destination numbers, and use ( - ), ( * ), and ( # ) characters.
- 1.
From the Home screen on the printer control panel, touch the Network  button to display the IP address or host name.
- 2.
Open a Web browser, and in the address line, type the IP address or host name of the printer exactly as it displays on the
printer control panel. Press the Enter key on the computer keyboard. The EWS opens.

- 3.
Using the top navigation tabs, click Fax.
- 4.
In the left navigation pane, click Speed Dials.
- 5.
To add a new speed dial, use the following steps:
- a.
Select the checkbox next to the Speed Dial Code you want to assign the fax number to.
- b.
- c.
In the Edit Speed Dial area, type a name for the speed dial in the Speed Dial Name: field.
- d.
Type the fax number for the speed dial in the Fax Number: field, and then click Add.

TIP:Multiple fax numbers can be associated with a single speed dial.
- e.
Click the OK button to save the speed dial.
- 6.
To edit a speed dial, use the following steps:
- a.
Select the checkbox next to the Speed Dial Code to edit, and then click Edit....
- b.
Edit the Speed Dial Name: or Fax Number:, and then click OK to save the changes to the speed dial.
- 7.
To delete a speed dial, select the checkbox next to the Speed Dial Code and then click Delete....
- 8.
Use the Import... button to import comma-separated value (.csv) files containing lists of contacts, speed dials, or user access codes. The
import feature allows you to load multiple contacts, speed dials, or user access codes all at once instead of one at a time.
- 9.
Use the Export All... button to save a list of the printer's address book contacts, speed dials, and/or user access codes to a single .csv file.
The resulting .csv file can then be saved to a location of your choice.
Method two: Manage speed dials using the control panel
There are 1000 speed dials (numbered 000–999) available on the printer control panel using the fax job screen. Speed dials
are listed on the fax screen by speed dial number, and the speed dial name is also displayed. Speed dials can have multiple
destination numbers, and use ( - ), ( * ), and ( # ) characters.
- 1.
From the Home screen on the printer control panel, touch the Fax button.
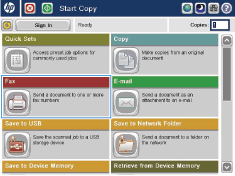
- 2.
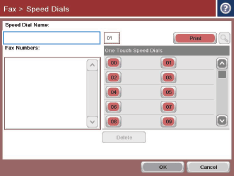
Touch the Speed Dials button to display the Speed Dials screen.
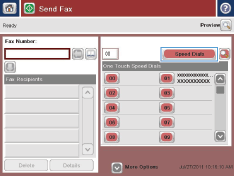
- 3.
Touch one of the unassigned One Touch Speed Dials numbers.
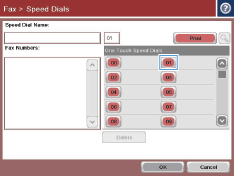
- 4.
Touch the Speed Dial Name field to display the keyboard.
- 5.
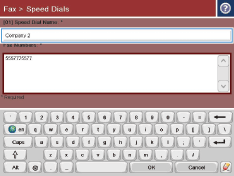
Type a name for the speed dial.
- 6.
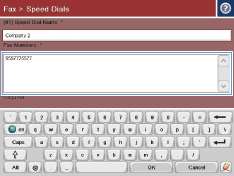
Type a fax number for the speed dial.

NOTE:To enter additional fax numbers for a speed dial, touch the screen to the right of the last digit of the previously entered
fax number. When the cursor appears, touch the enter key to move the cursor to the next line. Repeat this step to enter all
the numbers for the speed dial.
- 7.
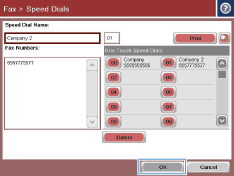
Touch the OK button.
The name and fax number (or numbers) display next to the selected One Touch Speed Dials number. Touch the OK button to return to the Fax screen.
Add a number to an existing speed dial list
- 1.
From the Home screen on the product control panel, scroll to and touch the Fax button.
- 2.
Touch the Speed Dials button to display the Speed Dials screen.
- 3.
Touch the One Touch Speed Dials number of the list to be edited.
- 4.
Touch the down arrow on the Speed Dial Name box to open the drop-down menu.
- 5.
Touch the Fax Numbers item.
- 6.
To add a fax number for a speed dial name, touch the screen to the right of the last digit of the last fax number in the list.
When the cursor appears, touch the enter key to move the cursor to the next line and then type the fax number.
- 7.
Touch the OK button to return to the Speed Dials screen.
- 8.
Touch the OK button to return to the Fax screen.
- 1.
From the Home screen on the product control panel, scroll to and touch the Fax button.
- 2.
Touch the Speed Dials button to display the Speed Dials screen.
- 3.
Touch the One Touch Speed Dials number of the list to be deleted.
- 4.
- 5.
Touch the Yes button to confirm the deletion of the speed dial list and to return to the Fax screen..
Delete a single number from a speed dial list
- 1.
From the Home screen on the product control panel, scroll to and touch the Fax button.
- 2.
Touch the Speed Dials button to display the Speed Dials screen.
- 3.
Touch the One Touch Speed Dials number of the list to open the keyboard.
- 4.
Touch the down arrow on the Speed Dial Name box to open the drop-down menu and then touch the Fax Numbers option.
- 5.
Scroll through the list of fax numbers and touch the screen to the right of last digit of the fax number to be deleted. Use
the backspace key to delete the fax number.
- 6.
Touch the OK button to return to the Speed Dials screen.
- 7.
Touch the OK button to return to the Fax screen.
Search a speed-dial list by name

TIP:If you do not know the unique name of the speed dial, type a letter to select any portion of the list. For example, to view
speed-dial names that begin with the letter N, type the letter N. If no matching entries exist, a message appears before the
search shows the entry that is closest to the letter N.
- 1.
From the Home screen on the product control panel, scroll to and touch the Fax button.
- 2.
Touch the search button. This button looks like a magnifying glass and is located to the right of the Speed Dials button.
- 3.
Type the first letters of the speed dial name to search for. As matches are found, the list at the top of the search screen
is populated. If necessary, scroll to see all the entries, or type more letters to narrow the search.
- 4.
Select the appropriate name from the list and touch the OK button. The speed-dial list on the main fax screen shows the selected entry within the list of numbers.
- 5.
Touch a speed dial number to add it to the recipients list.
- 6.
Select or search for additional names as needed.


 button to display the IP address or host name.


