- Introduction
- Before you begin
- Step one: Access the HP Embedded Web Server (EWS)
- Step two: Check for problems with sending e-mail
- Step three: Check the SMTP server setup
This document contains general information about how to troubleshoot issues when using Scan to E-mail.
Before you can set up Scan to E-mail, the HP printer must be connected to a network with an active internet connection. The Scan to E-mail feature will not work if the HP printer is not connected to a network.
Administrators need the following information before beginning the configuration process:
- •
- •
- •
SMTP server (e.g., smtp.mycompany.com)

NOTE:If you do not know the SMTP server name, SMTP port number, or authentication information, contact the e-mail/Internet service provider or system administrator for the information. SMTP server names and port names are typically found by doing an Internet search. For example, use terms like "Gmail SMTP server name" or "yahoo SMTP server name" to search.
- •

IMPORTANT:Consult your e-mail service provider's documentation for information on digital sending limits for your e-mail account. Some providers may temporarily lock your account if you exceed your sending limit.
- 1.
- 2.
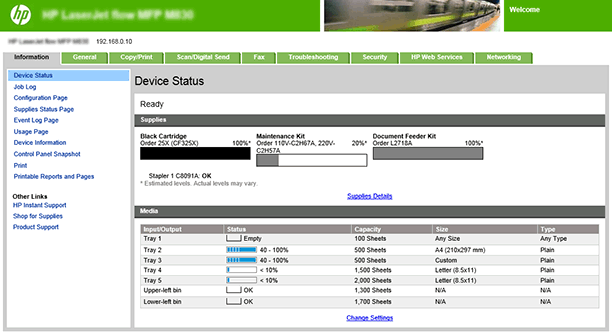
Open a Web browser, and in the address line, type the IP address or host name of the printer exactly as it displays on the printer control panel. Press the Enter key on the computer keyboard. The EWS opens.


NOTE:If the Web browser displays a message indicating that accessing the website might not be safe, select the option to continue to the website. Accessing this website will not harm the computer.

- 1.
- 2.
- 3.
- 4.

NOTE:This procedure is for Windows operating systems. The following steps show examples of responses from the server. The text portion of the response can vary from server to server.
- 1.
- 2.
- 3.
- 4.
- 5.
- 6.
- 7.
If the reply is 503.5.3.3 AUTH not available, then the SMTP server does not require authentication.
If the reply is 250 AUTH or 334, the SMTP server requires authentication. Use the E-mail Setup page on the Scan/Digital Sending tab of the embedded Web server to configure the correct authentication information.
- 8.
Verify that the server recognizes the e-mail account that is sending the message. At the prompt, enter MAIL FROM: <sender@domain.com> where “<sender@domain.com>” is the e-mail address for testing.
If the response is 550 Requested action not taken: mailbox unavailable, then the server cannot find the mailbox for that address.
If the response is 550 Requested action not taken: mailbox name not allowed, then the e-mail address is not valid.
- 9.
Verify that the server has sent the e-mail to the recipient. At the prompt enter RCPT TO: <recipient@example.com> where “<recipient@example.com>” is the e-mail address for the recipient.
If the response is 550 Requested action not taken: mailbox unavailable, then the server cannot find the mailbox for that address. The recipient e-mail account might be configured so that it cannot receive messages from the printer.
If the response is 551 User not local: please try <forward-path>, where “<forward-path>” is a different e-mail address, then the e-mail account is not active.
 button to display the IP address or host name.